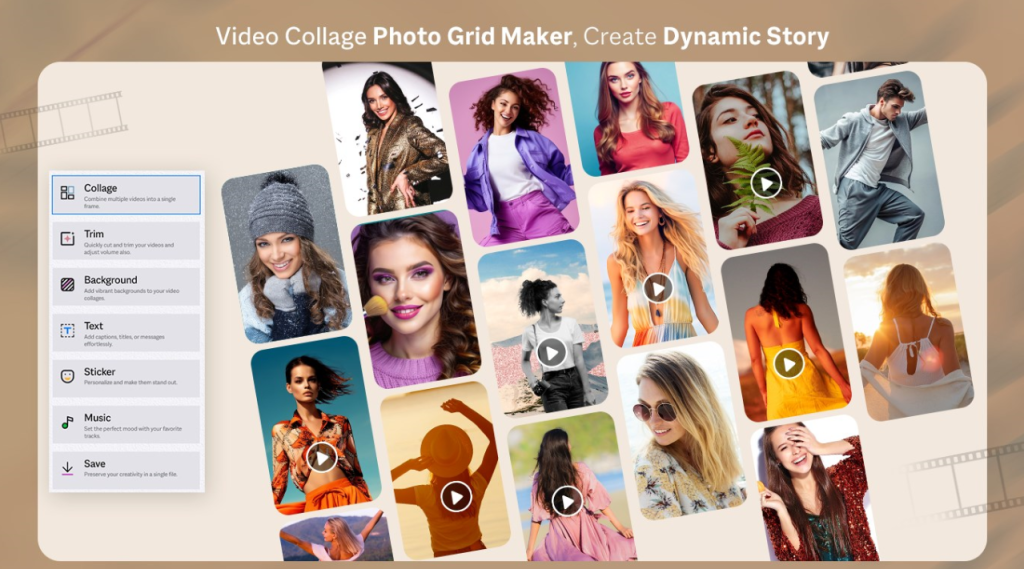
Video Collage - Photo Grid Maker
Create stunning video collages effortlessly with Video Collage - Photo Grid Maker for Windows.
Video Collage – Photo Grid Maker for Windows
Create stunning video collages and grids effortlessly with Video Collage – Photo Grid Maker for Windows. Whether you’re crafting an eye-catching Instagram post, sharing memories on Facebook, or uploading to Twitter, this powerful yet easy-to-use app lets you design visually appealing collages in just a few clicks.
With its intuitive interface, you can seamlessly stitch together your favorite videos and photos into a beautifully cohesive montage. Whether it’s a birthday, vacation, special event, or everyday moments, this app helps you present your clips in a stylish and creative format.
Key Features:
Multiple Grid Layouts – Choose from a variety of layouts, from simple grids to dynamic, multi-video arrangements. Organize your clips and photos in a unique way to suit your style.
Video Effects & Filters – Enhance your videos with stylish effects like Sepia, Lomo, Vintage, and more. Customize each clip to match the mood and aesthetic of your collage.
Add Background Music – Elevate your collage with the perfect soundtrack. Select from built-in music tracks or upload your own audio file to set the tone for your video montage.
Mix Photos & Videos – Combine videos and still images in one collage to create a dynamic, engaging story. Perfect for personal memories, social media posts, and creative projects.
Customizable Backgrounds – Personalize your collage with solid colors, gradients, or patterns to complement your theme and make your creation stand out.
Real-Time Preview – Fine-tune your collage before saving or sharing. Adjust clips, effects, music, and layouts to ensure everything looks perfect.
Easy Sharing – Export your video collage in high quality and share directly to Instagram, Facebook, Twitter, or save it to your Windows device for later use.
Whether you’re a beginner or a pro, Video Collage – Photo Grid Maker makes it simple to transform your favorite moments into stunning, professional-quality video collages. Unlock your creativity and bring your memories to life today!
Download now and start creating!
Open the Windows App Store and search for the app “Video Collage – Photo Grid Maker.” Click the “Get” button to download and install it on your system. Once the installation is complete, launch the app. You will find options like 2 Videos, 3 Videos, 4 Videos, and Grid Collage.
2 Videos:
Step 1: Open the app and click on the “2 Videos” option. Then, choose two videos from your system’s gallery.
Next, click on the “Collage” option and select your desired collage layout. The app provides a variety of trending collage grid layouts to choose from.
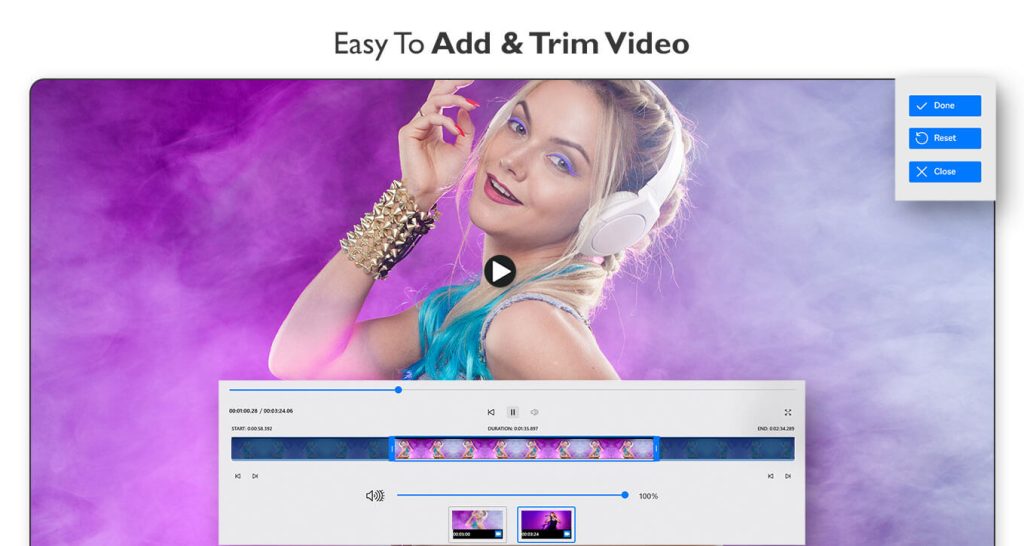
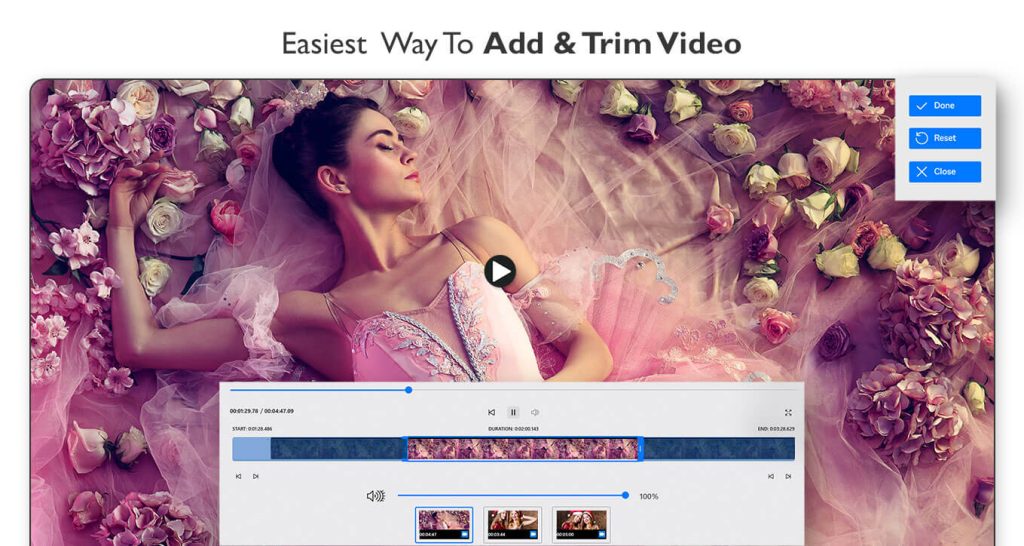
Step 2:- Now, click on the “Trim” button to adjust the length of both videos using the cursor. Trim each selected video one by one by dragging the handles to set the desired start and end points.
Once you have adjusted both videos, click the “Done” button to confirm your changes. Your video clips will now be trimmed and ready for the next editing step.
Step 3:-
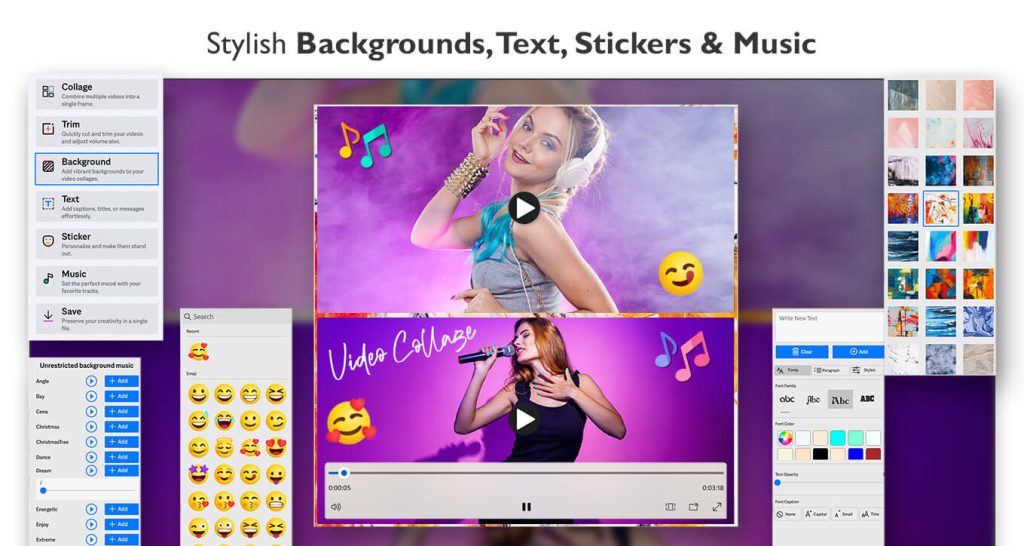
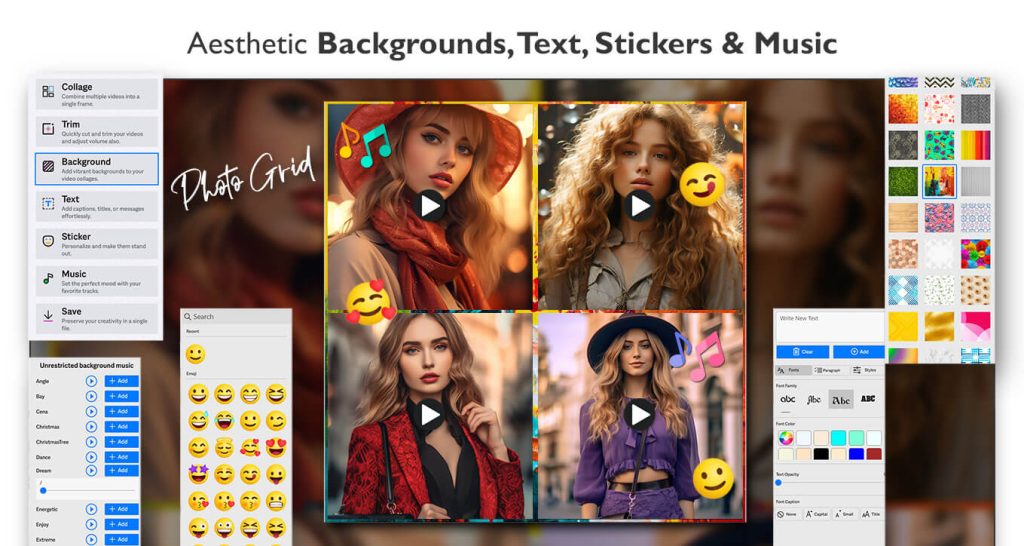
Set the Background: Click on the “Background” button and choose a background for your video collage grid. The app offers a variety of new and trending background options—select your favorite one.
Add Text: Click on the “Text” button to add a title or caption to your 2-video collage. You can customize the font style, change the text color, adjust the text opacity, and explore other formatting options to enhance your creation.
Add Stickers: Click on the “Sticker” button, browse different sticker categories, and select your favorite stickers to decorate your video collage.
Add Music: Click on the “Music” button to choose a default track from the app or upload your own music to personalize your video collage. Adding the right music will make your creation even more engaging.
Final Step:
Once everything is set, click the “Save” button to save your video collage. You can now share your creation with family and friends on your favorite social media platforms.
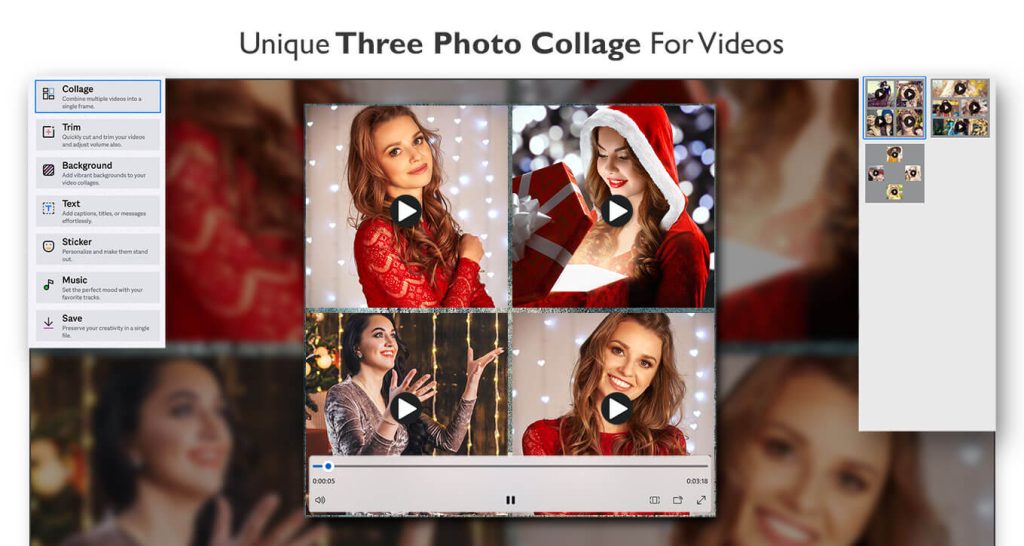
3 videos :-
Step 1:-
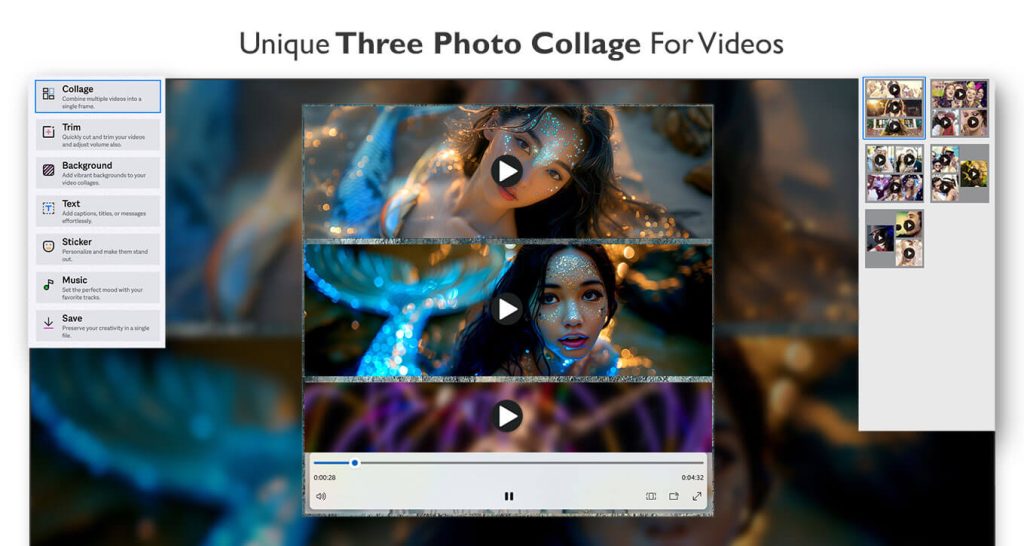
- Open the app and click on the “3 Videos” option.
- Select three videos from your system.
- Click on the “Collage” option and choose your preferred collage layout.
- Now, click on the “Trim” button to adjust the length of all three videos using the cursor. Trim each selected video one by one by dragging the handles to set the desired start and end points.
- Once you have adjusted all three videos, click the “Done” button to confirm your changes. Your video clips are now trimmed and ready for the next editing step.
Step 2:- Now, click on the “Trim” button to adjust the length of both videos using the cursor. Trim each selected video one by one by dragging the handles to set the desired start and end points.
Once you have adjusted both videos, click the “Done” button to confirm your changes. Your video clips will now be trimmed and ready for the next editing step.
Step 3:- Enhancing Your 3-Video Collage
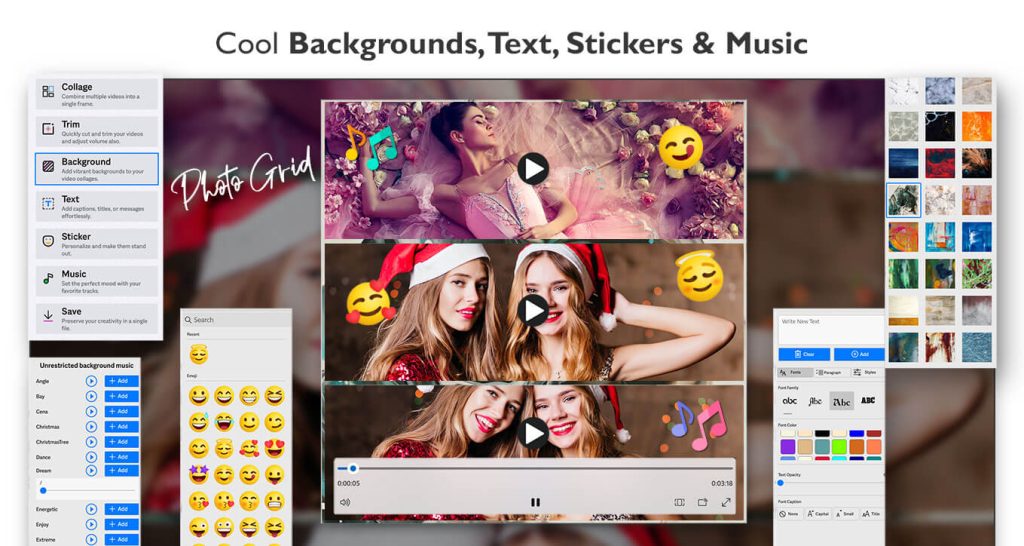
Set the Background: Click on the “Background” button and choose a background for your 3-video collage grid. The app provides a variety of new and trending backgrounds—select the one that best suits your creation.
Add Text: Click on the “Text” button to add a title or caption to your 3-video collage. Customize the font style, change the text color, adjust text opacity, and explore various formatting options to make your collage more visually appealing.
Add Stickers: Click on the “Sticker” button, browse through different sticker categories, and choose your favorite stickers to enhance your 3-video collage with fun and creative elements.
Add Music: Click on the “Music” button to select a default track from the app or upload your own music. Adding the right music will help set the mood and make your video collage more engaging and entertaining.
Final Step:
Once you’re satisfied with your edits, click the “Save” button to save your 3-video collage. You can now share your creation with family and friends on your favorite social media platforms and showcase your creativity!
Creating a 4-Video Collage: Step-by-Step Guide :-
Step 1:-
Select Videos and Choose a Layout
- Open the app and click on the “4 Videos” option.
- Select four videos from your system’s gallery.
- Click on the “Collage” option and choose your preferred collage layout.
Step 2:-
Trim Your Videos
- Click on the “Trim” button to adjust the length of all four videos.
- Use the cursor to drag the handles and set the desired start and end points for each video.
- Trim each video individually to ensure they align well in the collage.
- Once you’ve adjusted all four videos, click the “Done” button to confirm your changes.

Step 3:-
Customize Your Collage
- Set the Background: Click on the “Background” button and select a background for your 4-video collage. The app provides a variety of new and trending background options—pick the one that best fits your style.
- Add Text: Click on the “Text” button to add a title or caption to your collage. You can customize the font style, change the text color, adjust the text opacity, and explore other formatting options to enhance your creation.
- Add Stickers: Click on the “Sticker” button, browse through different sticker categories, and select your favorite stickers to add creative elements to your 4-video collage.
- Add Music: Click on the “Music” button to choose a default track from the app or upload your own music. The right music will make your video collage more dynamic and engaging.
Final Step: Save and Share
Once all the edits are done, click the “Save” button to store your 4-video collage. Now, you can share your masterpiece with family and friends on your favorite social media platforms!
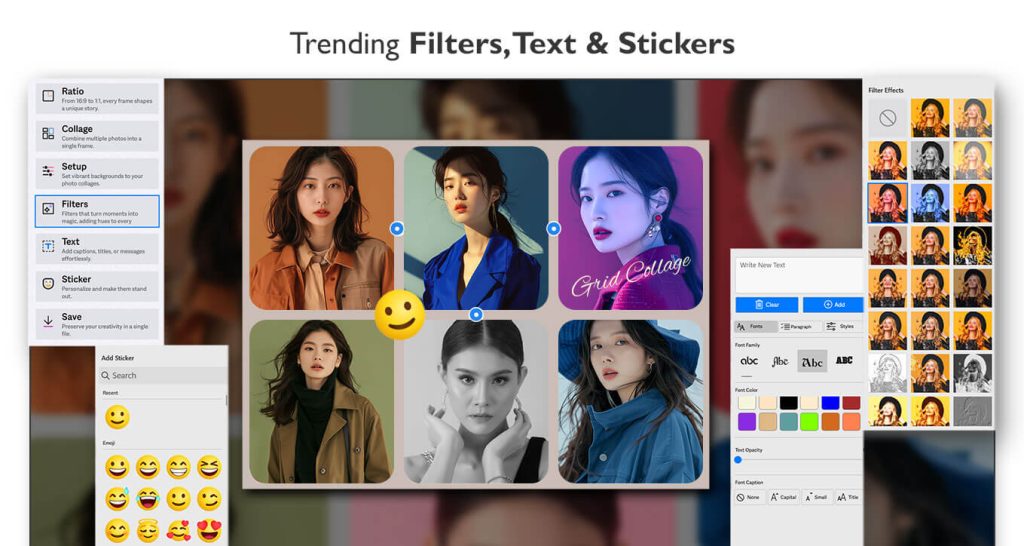
Creating a Grid Collage: Step-by-Step Guide
Step 1:-
Select Videos and Choose a Layout
- Open the app and click on the “Grid Collage” option.
- Select multiple images from your system’s gallery.
- Click on the “Ratio” option and choose your preferred collage ratio. The app offers a variety of trending social media ratios, allowing you to create a collage that fits perfectly on different platforms.
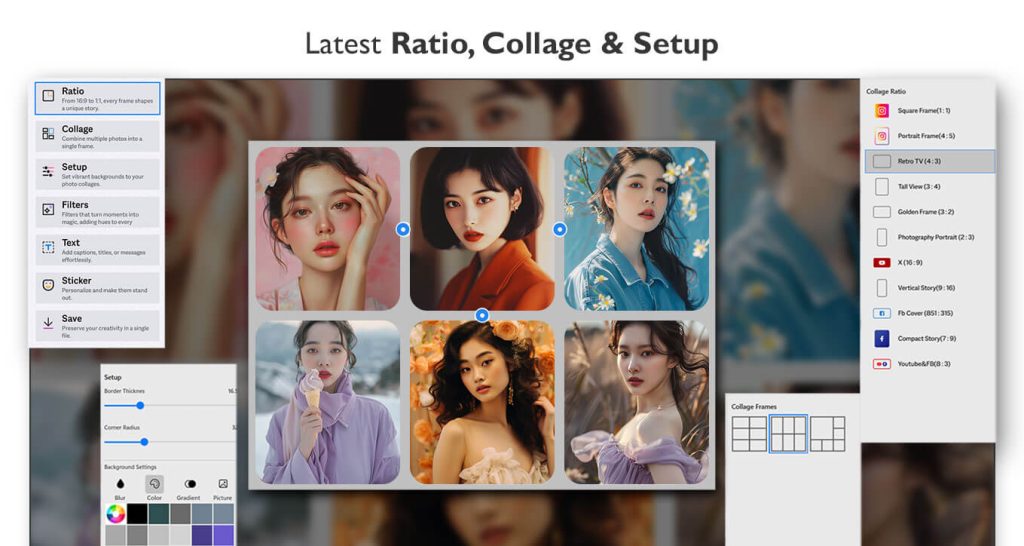
Step 2:
Customize Your Grid Collage
- Choose a Collage Frame: After selecting the ratio, click on the “Collage” button and choose your favorite collage frame from the available options.
- Adjust Collage Settings: Click on the “Setup” button to customize the collage layout:
- Adjust border thickness and corner radius to refine the look.
- Modify the background settings by choosing a color, gradient, blur effect, or an image.
- You can also add your own custom background by clicking on the “+” (Add) icon.
- Apply Filters: Use the “Filter” option to apply trending filter effects and enhance the appearance of your collage.
- Add Text and Stickers: Personalize your collage further by adding text and stickers to make it more creative and engaging.
Save and Share: Once you’re happy with your collage, click the “Save” button to save it in your preferred format. Now, you can share your stunning collage creation with family and friends on social media!